How to Inspect and Maintain Motorcycle Lighting
Inspect motorcycle lighting before rides by checking every function, lens, housing, mount, connector, wire route, control and beam aim. Maintain it by cleaning lenses with product-safe materials, tightening only to specified torque, correcting moisture or damage at its source and replacing components with exact compatible parts. Test the complete system again after any work.
Safety note: Lighting affects visibility and electrical safety. Follow current product and motorcycle instructions, disconnect power when directed, never guess wire functions or fuse ratings, and use a qualified technician when diagnosis is uncertain.
1. Test every lighting function
With the motorcycle safely parked, check low beam, high beam, running lights, brake lights, turn signals and any approved auxiliary functions. A lamp that illuminates can still have an incorrect function or intermittent connection.
2. Inspect headlights and auxiliary assemblies
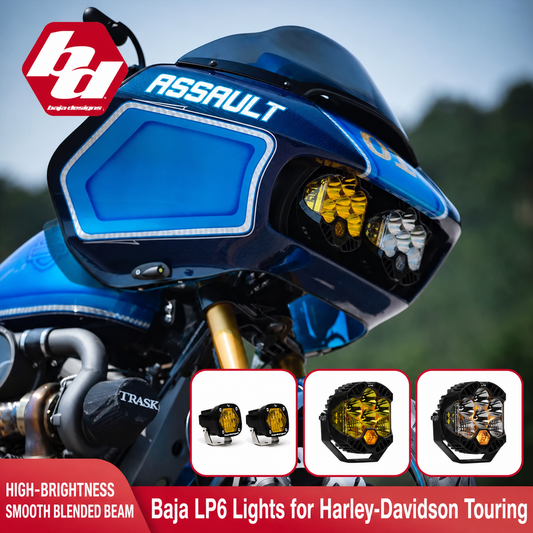
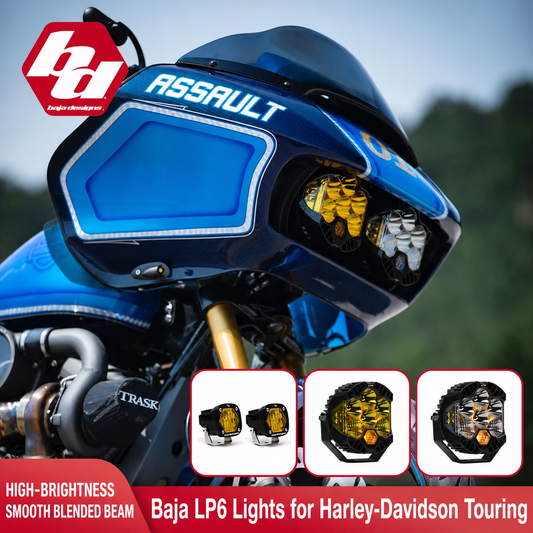
Look for cracked lenses, moisture, loose fasteners, shifted aim, damaged wiring and heat marks. On modular systems, identify the exact lamp, lens, mount, harness and controller before replacing anything.

This Baja-style range illustrates why each headlight and auxiliary component should be identified separately during inspection.
3. Check guard-mounted lights at vibration points
Inspect brackets, fasteners and wire protection where the light meets the guard. Turn the bars and compress suspension as instructed to confirm clearance.

These guard-mounted running and signal lights make bracket security and wire routing key inspection points.
4. Document modular components
Record part numbers and installed options for lamps, lenses, mounts, switches, harnesses and controllers. This prevents mismatched replacement parts later.

DENALI options span lamps and supporting components, so accurate component records simplify maintenance.
5. Inspect controllers and accent-light wiring
Look for loose connectors, pinched wires, corrosion, heat damage and control faults. Accent lighting remains separate from required safety functions.

This RGB system uses configuration-specific components that should be checked as one complete installation.
6. Check compact turn signals carefully
Low-profile signals can hide loose mounts or strained wiring. Confirm visibility, secure attachment and correct flash behavior.

These hidden mini LED handlebar signals require close checks at their mounts and wire routes.
7. Verify rear multi-function lights
Test running, brake and turn functions separately from both sides and from useful viewing angles. Confirm seals and saddlebag wire connections.

These sequential saddlebag lights combine multiple functions that should each be tested independently.
Inspection schedule
| When | Checks |
|---|---|
| Before every ride | Required functions, obvious damage and lens cleanliness |
| After rain or washing | Moisture, connector condition and operation |
| After service or modification | Wire routing, clearance, aim and complete function test |
| Before night touring | Beam aim with normal load and all lighting functions |
Maintenance checklist
- Clean lenses with materials approved for their surface.
- Correct moisture intrusion instead of only wiping the lens.
- Secure wiring away from heat, edges and moving parts.
- Use specified fastener torque and electrical protection.
- Replace only with exact compatible components.
- Retest every function and beam aim after work.
Frequently asked questions
How often should motorcycle lights be checked?
Check required functions before every ride and perform a closer inspection after severe weather, washing, service or modification.
Can condensation be ignored?
No. Persistent moisture can indicate a sealing or venting issue that needs correct diagnosis.
Should LED bulbs be touched with bare hands?
Follow the component instructions; handling guidance varies by lamp design.
When should beam aim be rechecked?
After lamp or suspension work, load changes or any impact that may move the assembly.
Fitment details and availability verified against active Motor Club Shop listings on September 13, 2026. Current product pages, manufacturer instructions and applicable law take priority.
タグ:
関連記事
Full-Grain vs Top-Grain Leather Crossbody Bags
Sep 13 2026

How to Choose Skull Rings as a Gift
Sep 13 2026
Leather Backpack Size, Capacity and Fit Guide
Sep 13 2026